


Interfacing of Nokia display with an Arduino
Nokia 5110 LCD is a versatile display for presenting text or any Bitmap image. We will be going to see the interfacing and programming of this display with Arduino.
In this tutorial, we will see the complete guide on NOKIA 5110 and its interfacing with Arduino. This display has a wide application of displaying data. This display module is very cheap, and you can use it with many development boards and micro-controller. Nokia display is an 84×48(or 48×84) graphic LCD that can control/display any data with the help of an internal controller called PCD8544. It is a great choice to display data.
The main objective of this tutorial will be:
- We will learn the basics about NOKIA5110 LCD
- We will learn how to interface it with Arduino
- We will generate the code for displaying a text
Basics About Nokia 5110 Display:
Nokia 5110 has an interior controller/Driver named PCD8544. With the assistance of this, we will display the info onto LCD. The PCD8544 could be a low-power CMOS LCD controller/driver designed to drive a graphic display of 48 rows and 84 columns.
All necessary functions for the display are provided during a single chip, including on-chip generation of LCD supply and bias voltages, leading to a minimum of external components and low power consumption.
The PCD8544 are going to be interfacing to microcontrollers by a serial bus interface. The PCD8544 is manufactured in n-well CMOS technology.
NOKIA 5110 LCD screen uses SPI protocol to search out a DIN pin which might even be called MOSI(Master-Out Slave-In). So, all we’ll do is pass commands with a pair of 8-bit data through the DIN pin while using the opposite pins(like DC, CE, and CLK pins) simultaneously and appropriately.
Specifications
- 48 x 84 Dot LCD
- Serial Bus Interface with maximum high speed 4.0 Mbits/S
- Internal Controller No.PCD8544
- LED Back-Light
- Run at Voltage 2.7 -5.0 Volt
- Low power consumption; it is suitable for battery applications
- Temperature range from -25 ̊C to +70 ̊C
- Support Signal CMOS Input
Pinout
Let’s understand the pinout of this display. We will also see the significance of each pin.

RST – Signal RESET for the operation of LCD- CE – Chip Enable, Pin CHIP ENABLE to control operation.
- D/C – Pin to configure the information formats between Data and Command.
- DIN – Serial Input, Pin DATA (SERIAL DATA LINE)
- CLK – Pin CLOCK (SERIAL CLOCK LINE)
- VCC – 3.3V, to provide power supply from the microcontroller
- LIGHT – Backlight Control, to control operation of LED (Back Light)
- GND – Ground
Components Required
For interfacing and LCD with the Arduino, we will need the following components :
Interfacing with Arduino
Make connections as shown in the diagram:
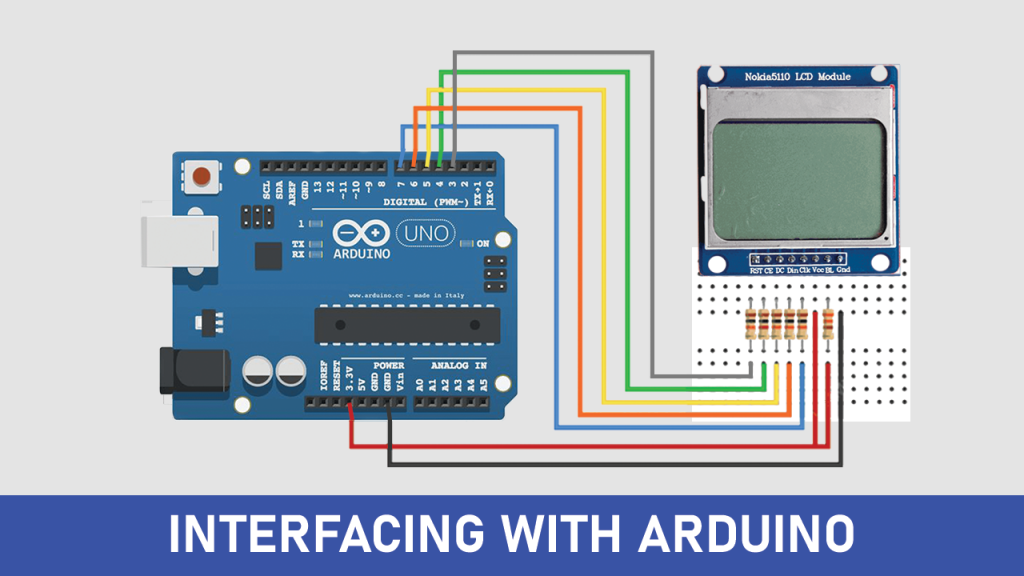
The wiring of Nokia5110 LCD with Arduino is explained as follows:
| Nokia 5110 LCD | The Arduino |
| RST | 3 |
| CE | 4 |
| DC | 5 |
| DIN | 6 |
| CLK | 7 |
| VCC | 3.3V |
| BL | 3.3V (through 220Ω resistor) |
| GND | GND |
Coding
Before proceeding to the coding part, we need to download few libraries to execute code properly. In the Arduino IDE, go to Tools -> Manage Libraries. Search for “PCD8544 Nokia”.
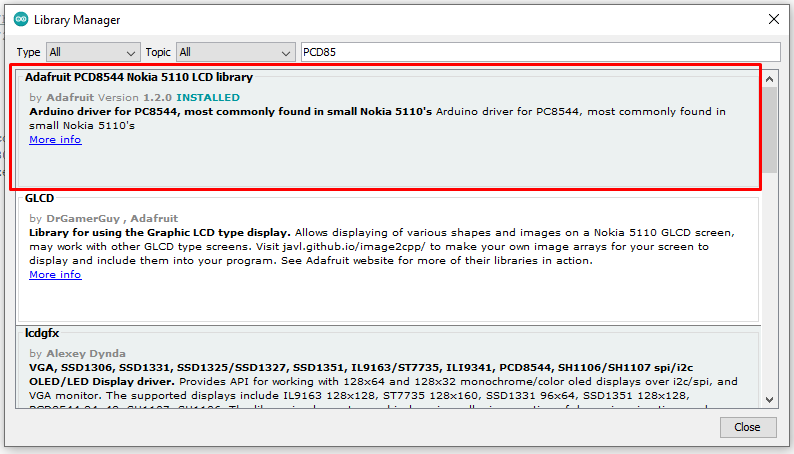
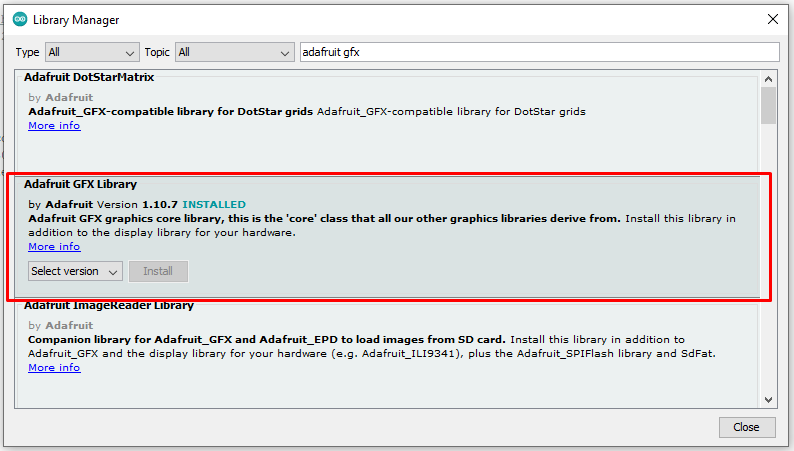
You need to select the library “Adafruit PCD8544 Nokia 5110 LCD Library ” and click on install. One more additional library we need to install for displaying graphics on the LCD, which is ” Adafruit GFX Library. “
Output
Conclusion
We just learned a simple project of displaying text on this LCD. At the advanced level, you can display bitmap images and much more. I hope you will find this article helpful. please comment if
- you have any doubt related to this tutorial
- Need any help from me
- If you find any issue with the code/tutorial