


Traffic Light Controller Using Arduino
This project is a simple three-way version of the traffic light controller using Arduino and very few components. It has a circuit diagram and the code for the traffic controller system.
The Arduino is the most popular open-source microcontroller board used for many electronics and DIY projects. Traffic light controller by using Arduino is a simple electronic project. Nowadays, everyone prefers a personal vehicle. Hence, the number of vehicles on the road is increasing continuously, which results in traffic jams.
Traffic light controller helps to manage the traffic and to maintain proper traffic management. These systems are placed at the intersections of the road or at the crossings to avoid congestions and accidents. The systems indicate to the driver by using different colours of light. Therefore it is simple to avoid congestion at the intersections.
This project is the traffic light controller by using Arduino. It is an electronic project by which we will get knowledge about traffic lights and how they work. This project is the simple version of a traffic light system where we have demonstrated it for three sides or ways.
Need for Traffic Light System:
Roads without any supervision or guidance can lead to traffic conflicts and accidents. Traffic signals are required for an orderly flow of traffic. A traffic signal is used as an instructing device that indicates the road user to act as per the displayed sign.
Traffic lights allow everyone to cross the intersection point one by one, reducing conflicts between vehicles entering intersection points from different directions. It provides road safety, also helps to solve traffic in simple manners.
There are different colours in traffic lights. Each light has a meaning, and these lights tell drivers what to do.
- Red light ON- A driver should stop.
- Yellow light ON- A driver has to slow down and be ready to stop.
- Greenlight ON- A driver can start driving or keep driving.
Circuit Connection (LED with Arduino)
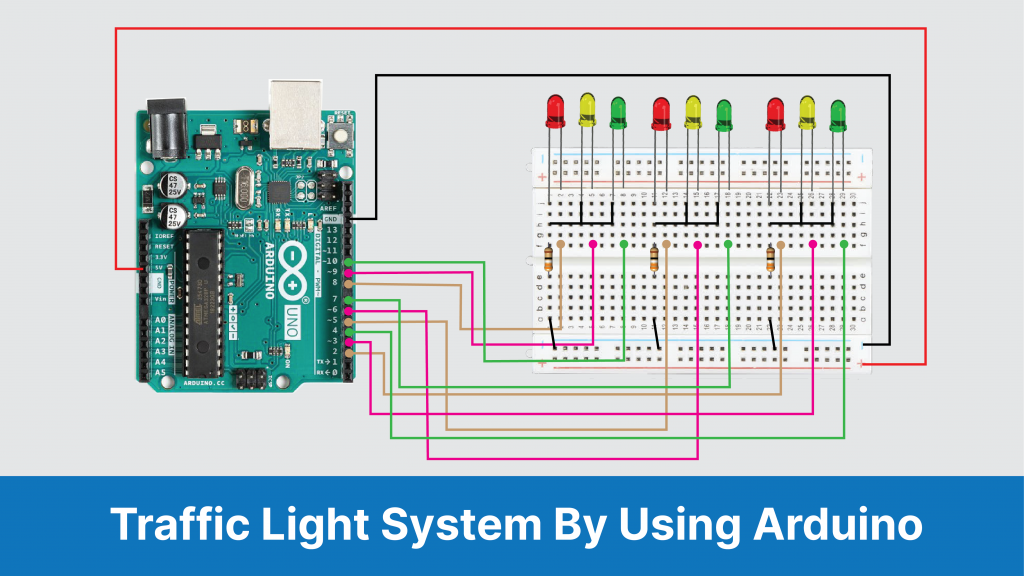
This is the circuit diagram for the traffic light controller by using Arduino.
- Connect LEDs on the breadboard as Red, Yellow, Green, respectively.
- Connect the negative terminal of the LED and connect the 220 Ohm resistor in series.
- Connect these negative terminals to the ground.
- Connect the positive terminal of the LEDs to the pins 2 to 10, respectively.
- Power the breadboard by using 5V and GND on the Arduino.
The logic of This Traffic Light System Using Arduino Code
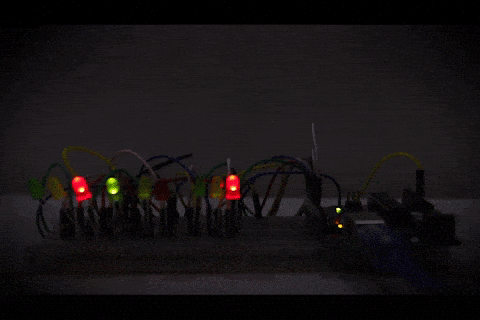
The code for this traffic light controller is simple and easy to understand. We have exhibited traffic lights for a three-way road. The LEDs will be glowing in a particular sequence to form an actual traffic light controller system.
At a time, two red LEDs will glow, and one Green LED will be ON. Also, two yellow LEDs will be ON for one second. Yellow LED will Glow on each transition between RED to GREEN. In short first RED LED will glow for 5 Seconds, then YELLOW for 1 second, and then Green LED will ON for 5 seconds.
In the void setup of the code, we have defined the pins for the LEDs as outputs from 2 to 10. In the void loop section, we have defined the functions to turn LEDs ON and OFF into the sequence.
Code & Software
Upload the following code in the Arduino software.
Advantages
- The traffic light controller in this system can be implemented practically, and it could be expanded further by you.
- This traffic light controller includes a crosswalk signalling system.
- External memory can be interface with the central controller so that the timings are not fixed during its programming but instead can be programmed during operation.
Limitations
- The project is not suitable for actual implementation but just a demonstration of the process behind the system.
- The project can either operated manually or by using pre-programming operations. It cannot handle in both ways.
- In the real-time traffic controller systems, the operator has the right to change the timings and the intensity of the traffic light in each lane.
Final Words
Thank you for being with me till the end of this project. I hope you have understood all the concepts about traffic light control and its importance. If you like this project, try to implement it and let me know your comments section’s experiences.