


MQ2 Sensor Interfacing with Arduino – Gas and Smoke Detection
Gas sensor is a device which detects the concentration level of the gases present in the atmosphere. This project contains interfacing of MQ2 sensor with Arduino and its code.
Nowadays, sensors play a major role in safety systems. In order to detect smoke and fire, smoke sensors are used. They provide appropriate action on time for safety purposes. There are numerous types of sensors available to measure environmental characteristics like light, noise, smoke, etc.
One such sensor used in safety systems to detect harmful gases is the MQ2 Gas sensor. If you want to make an indoor air quality monitoring system, breath checker, or early fire detection system, the MQ2 sensor is a suitable choice.
In this tutorial, we are going to discuss how to interface the MQ2 smoke detector sensor with Arduino and its code. The MQ2 sensor is a powerful sensor in order to measure different types of gases like Butane, Methane, LPG, Smoke, Alcohol, Propane, Hydrogen concentrations in the air.
How Does Gas Sensor Work?
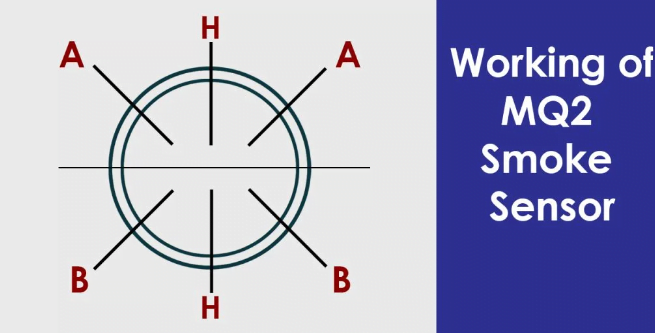
The sensor has a sensing element in order to sense the smoke or any gaseous material. In this sensor, the sensing material is a stainless steel mesh. This mesh contains aluminium-oxide-based ceramic, coated with tin dioxide.
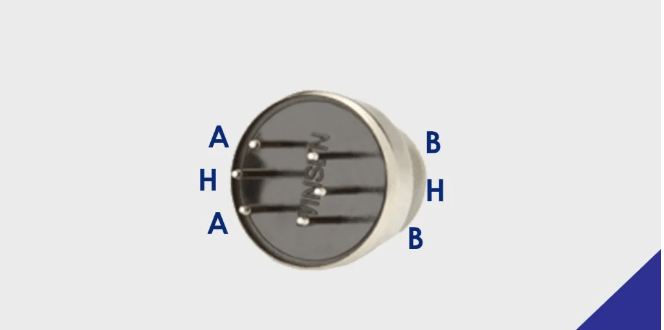
There are mainly 6 leads in the sensing element. Two are used for heating of sensing elements, the remaining four are used for the output signal.
Let’s consider that we want to identify the Oxygen gas, the oxygen atoms get absorbed on the sensing element when it will be heated at a higher temperature.
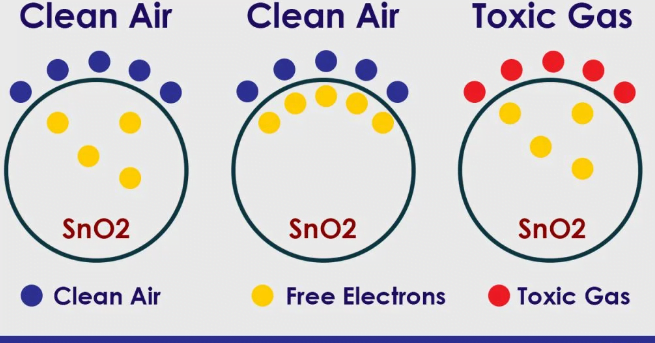
Tin oxide has donor electrons present in it, which are attracted towards oxygen. So by identifying the donor electrons, we can detect the amount of oxygen that gets absorbed as well as we can oppose the flow of current to give the signal.
When reducing gases are present on the sensor, oxygen atoms try to interact with reducing gases and reduce the absorbed surface density of the oxygen atom. Hence current can flow through the sensor to generate an analog output signal.
This output signal generates the voltage values by which we will get an idea about the concentration of gases. When the concentration of gas is high voltage will be high.
What is MQ2 Gas Sensor?
The MQ2 module of the gas sensor is useful for gas leakage detection in the home as well as in the industries. It observes the level of gases present in the atmosphere. The gas sensor operates on 5V and 800mW.
Depending on the level of concentration, the sensor observes the potential difference and this changes the resistance of the material inside the sensor. The output voltage value gives us the type of gas.
Normally these sensors are available as a comparator. These comparators are able to set up a threshold value for gas concentration. The digital pin will go high only when the concentration of the gas is above the threshold value. The sensor will work in analog mode to detect the concentration of the gas.
Construction of the Gas Sensor

Generally, all types of gas sensors including MQ2 gas sensors are constructed by metal oxide semiconductors. These gas sensors have one sensing element which is consists of the following elements.
- Tubular ceramic
- Electrodes
- Heater Coil
- Gas sensing layer
- Electrode line
This sensing element is responsible to process all the parameters and detect the type of gas.
Pinout of the Gas Sensor
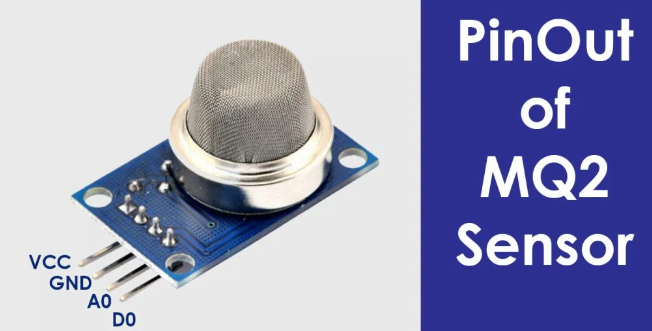
- VCC provides power to the sensor comparator board and needs to be connected to the 5V of the Arduino
- GND is the ground pin and needs to be connected to the GND pin of the Arduino.
- D0 is the digital output pin, which shows the digital representation of the detected gas.
- A0 is the analog output pin from which we can detect the gas type by analyzing analog values.
How to Adjust the Sensitivity of Gas Sensor
In order to adjust the sensitivity of this sensor for the particular type of gas, you need to keep this sensor in the particular gas type you want to detect. Now we have to rotate the potentiometer on the sensor.
Rotate it till the Red LED on the sensor gets ON. If we have to increase the sensitivity, rotate it clockwise, and if we have to decrease the sensitivity we have to rotate it anticlockwise.
When we are rotating this potentiometer basically we are adjusting the threshold value of the sensor. The comparator on this board is constantly checking the threshold value.
Once this threshold gets crossed the digital pin goes high and the LED will turn on. In this way calibrate your sensor, it may take some time but once you calibrate it, it will give you accurate readings.
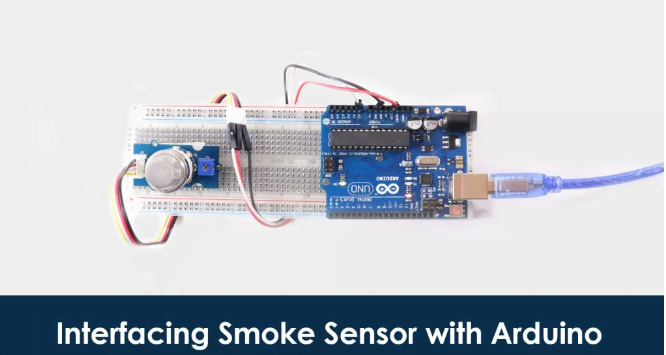
Interfacing of MQ2 Sensor with Arduino
Connect your MQ2 sensor with the Arduino as shown in the above diagram.
- Connect the VCC pin of the sensor to the 5V of the Arduino.
- Connect the GND of the sensor to the GND of the Arduino.
- Connect the digital pin of the sensor D0 to the digital pin number 8 of the Arduino
- Connect the analog pin of the sensor to the analog pin A0 of the Arduino.
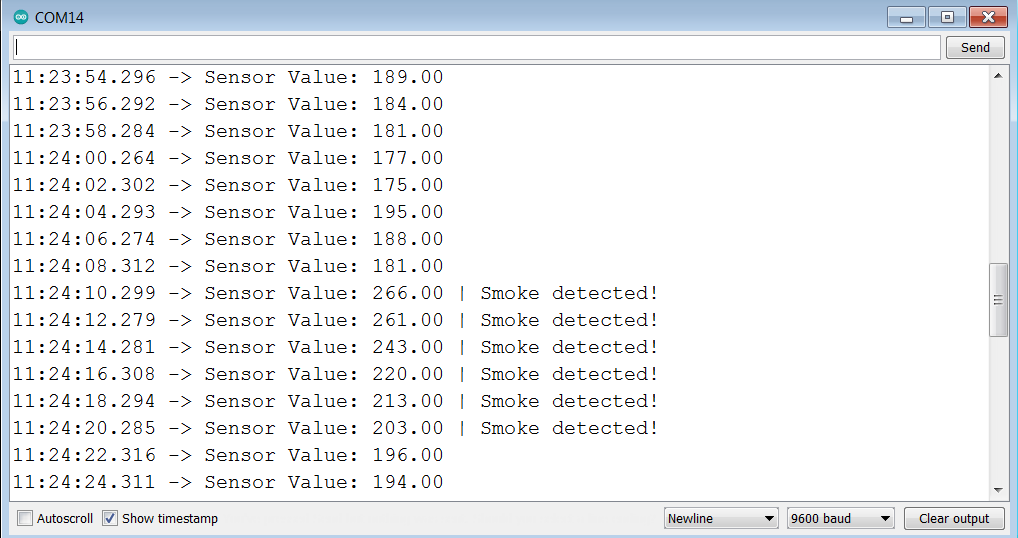
Code & Software
#define MQ2pin (0) float sensorValue; //variable to store sensor value void setup() { Serial.begin(9600); // sets the serial port to 9600 Serial.println(“Gas sensor warming up!”); delay(20000); // allow the MQ-2 to warm up } void loop() { sensorValue = analogRead(MQ2pin); // read analog input pin 0 Serial.print(“Sensor Value: “); Serial.print(sensorValue); if(sensorValue > 200) { Serial.print(” | Smoke detected!”); } Serial.println(“”); delay(2000); // wait 2s for next reading }
Final Words
Thank you for being with me till the end. Hope you got all the concepts of the MQ2 gas sensor and how to interface it with the Arduino. Refer to this article while performing your project. Also, if you like this project don’t forget to comment.