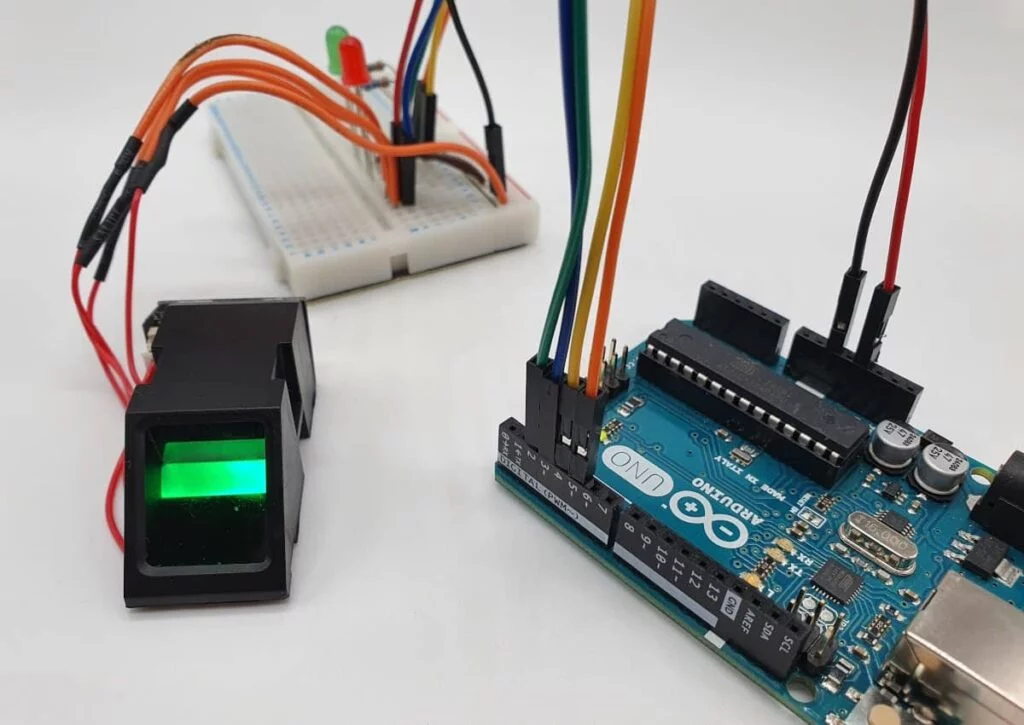
Interfacing a fingerprint sensor with an Arduino can be a useful way to add biometric security to your projects. Here’s a complete guide on how to do it:
Components Needed:
- Arduino board (e.g., Arduino Uno)
- Fingerprint sensor module (e.g., Adafruit Fingerprint Sensor)
- Jumper wires
- Breadboard (optional)
Steps:
Wiring:
- Connect the VCC pin of the fingerprint sensor module to the 3.3V or 5V output of the
- Connect the GND pin of the module to the GND pin of the
- Connect the TX pin of the module to one of the digital pins (e.g., Digital Pin 2) of the
- Connect the RX pin of the module to another digital pin (e.g., Digital Pin 3) of the Arduino.
Code:
You’ll need to use a library to communicate with the fingerprint sensor. One popular library is the “Adafruit Fingerprint Sensor” Here’s a basic example of how to use it:
Install Library:
Open the Arduino IDE, go to “Sketch” > “Include Library” > “Manage Libraries.” Search for “Adafruit Fingerprint Sensor” and install it.
#include <Adafruit_Fingerprint.h>
#define FINGERPRINT_RX 3
#define FINGERPRINT_TX 2
Adafruit_Fingerprint finger = Adafruit_Fingerprint(&Serial1);
void setup() {
Serial.begin(9600);
finger.begin(FINGERPRINT_RX, FINGERPRINT_TX);
}
void loop() {
getFingerprintID();
delay(1000); // Delay between readings
}
void getFingerprintID() {
uint8_t p = finger.getImage();
if (p == FINGERPRINT_OK) {
p = finger.image2Tz();
if (p != FINGERPRINT_OK) {
Serial.println(“Image conversion failed”);
return;
}
p = finger.fingerFastSearch();
if (p == FINGERPRINT_OK) {
Serial.println(“Fingerprint found!”);
} else if (p == FINGERPRINT_PACKETRECIEVEERR) {
Serial.println(“Communication error”);
} else if (p == FINGERPRINT_NOTFOUND) {
Serial.println(“No match found”);
} else {
Serial.println(“Unknown error”);
}
}
}
Operation:
- The code initializes the fingerprint sensor and checks for a fingerprint match in the loop.
- When a fingerprint is placed on the sensor, it captures the image and searches for a match.
- The result is printed on the serial monitor.
Enrollment (Optional):
If you want to use the fingerprint sensor for identification, you need to enroll fingerprints first. Libraries often provide functions for enrolling new fingerprints into the system. Check the documentation of the specific library you’re using.
Customization:
Depending on the fingerprint sensor model, you might need to modify the code and pin assignments. Refer to the datasheet and library documentation for guidance.
Safety Considerations:
Ensure that your project respects privacy and legal considerations when using biometric data. Store and handle fingerprint data securely.
This guide provides a basic understanding of interfacing a fingerprint sensor with an Arduino. For more advanced applications, consider integrating the fingerprint sensor with databases, security systems, and other devices. Always refer to the documentation provided with the fingerprint sensor and any associated libraries for accurate instructions.
Written by kanchan kan
- Industrial Automation141141 products
- Cooling Fan44 products
- Indicators1111 products
- Plastic Casing66 products
- Sensor2323 products
- Sleeve and cables55 products
- SMPS88 products
- Solid State Relay Module22 products
- Switches1818 products
- Temprature Sensor11 product
- 3D Printing180180 products
- 3D printing110110 products
- Combination Kit4747 products
- Electronic743743 products
- Audio55 products
- Battery/Charger Accessories2828 products
- Capacitors6464 products
- Connector4646 products
- cooling fan11 product
- Diode3535 products
- Displays1212 products
- IC and Chips6565 products
- IOT and Wireless99 products
- Leds2424 products
- Microcontrollers55 products
- Modules/Shield7575 products
- MOSFET / IGBT1414 products
- Power Supply2525 products
- Resistors130130 products
- Sensors5959 products
- SMD2828 products
- Switches1414 products
- Transistors6868 products
- Wire and Cables1212 products
- Hardware3232 products
- Hand Tools1414 products
- Hardware Accessories1414 products
- Printing22 products
- RC Plane and Drone99 products
- Robotic147147 products
- BO Motors1313 products
- General Purpose DC Motors2929 products
- Motor Drivers88 products
- Robotic Wheels & Tyres1414 products
- Servo Motor2727 products
- Stepper Motors88 products
- Synchronous Motor11 product
- Science Fair Project7070 products
- Final Year Ready Project Kit11 product
- STEM KIT2222 products
- E Books88 products


Leave a Reply
You must be logged in to post a comment.