


How to Interface ESP8266 with Arduino
In this tutorial, we will learn how to use Arduino as an IoT device with the help of ESP8266. In this tutorial, we will go with step by step process of basic information, connections and code of this project.
If you want to build an IoT project as a beginner, then ESP8266 is a fresh start to enter the IoT field. ESP8266 module can be programmed in two ways: By LUA scripting and the second is by Arduino programming. As Arduino is gaining much popularity in Embedded system, we will program this module through an Arduino IDE. This tutorial is all about interfacing and programming the ESP8266 module with Arduino.
What Is ESP8266?
ESP8266 is a Low-cost wifi module that can provide internet connectivity to your small-scale embedded system/projects. This module comes with a single-chip CPU, GPIO pins, analog pins, I2C and SPI pins. The processor used in this module is the L106 32 bit RISC microprocessor, which runs on 80 MHz at Tensilica xtensa Dimond’s standards. Let’s look at some of its cool features first.
Features of ESP8266:
- On-chip Wi-Fi modules
- It has 2 GPIO pins
- Has inbuild 10 bit ADC (Analog to digital converter)
- 32 KB instruction RAM
- 16 KB system data RAM
- 32-bit microcontroller
- UART On dedicated Pins can be transferred UART to GPIO 0
- L106 32-bit RISC microprocessor core of Tensilica Xtensa Diamond standards 106 Micro run at a frequency of 80 MHz
- Pinout of ESP8266
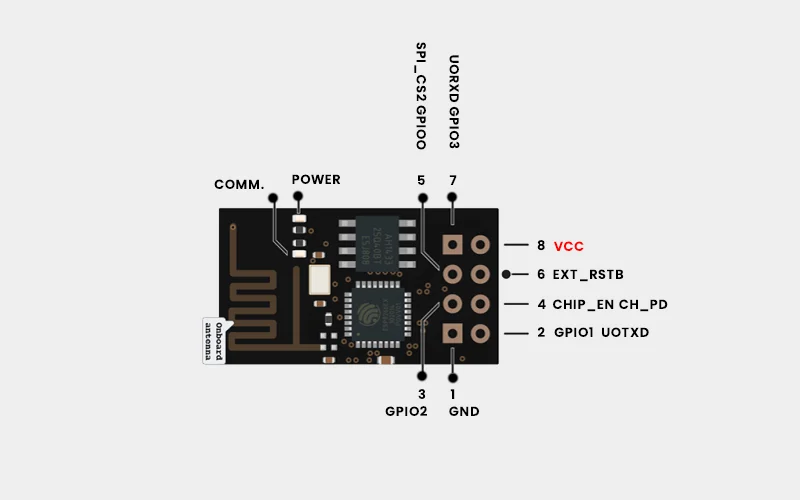
PinDescriptionVCCThis is the power pin for 3.3vGNDGround pin for giving 0 voltRxReceiver pin used to
receive serial data from another deviceTxTransmitter pin used to
transfer serial data to other devicesCH_EnChip enable pin, usually connected to 3.3 volt due to active-high propertyGPIO 0General-purpose GPIO pin basically has two used
1) used as a normal GPIO pin
2) used to enable the programming mode of ESP8266GPIO 2Used as a GPIO pin
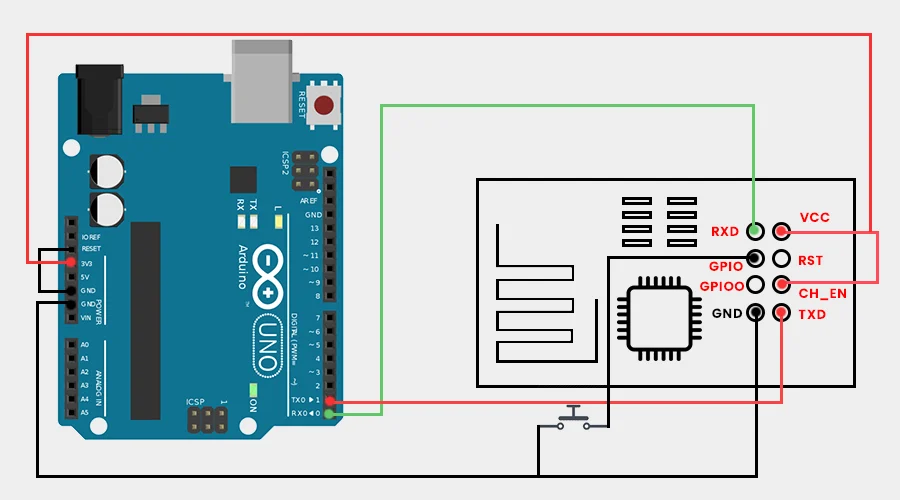
ESP8266-01 connection with Arduino
While connecting an ESP8266 with Arduino, you have to make the connection as follows:
| ESP8266 | Arduino |
|---|---|
| VCC | 3.3v |
| GND | GND |
| CH_EN | 3.3 v |
| RST | Normally open, GND to reset |
| GPIO 0 | GND |
| Tx | Tx |
| Rx | Rx |
Software, Boards Installation:
- fter that, we need to install the ESP8266 Board in Arduino IDE.
- Copy the following link to add ESP8266 or ESP8266 integrated board in Arduino IDE.
- http://arduino.esp8266.com/stable/package_esp8266com_index.json
- Go to Arduino IDE, then follow the path File/preferences and open the preference tab.
- And paste the above link in the additional board manager URL box as shown in the image.