


How to Build a Simple Arduped 2 Biped Robot

If you’ve ever wanted to make your own simple Arduino walking robot, the Arduped 2 Biped Robot is the perfect project.
It’s easy to build, uses low-cost parts, and requires only basic tools. With a few SG90 servo motors, an HC-SR04 ultrasonic sensor, and 3D printed parts, you can create a DIY obstacle-avoiding biped robot in just a few hours.
This step-by-step beginner guide will show you how to assemble, wire, and program your simple 3D printed Arduino biped robot.
What is the Arduped 2 Biped Robot ?
The Arduped 2 is a tweaked and improved version of David Ultis’s original Arduped Biped Robot.
It features:
A redesigned build platform and head sensor mount for stability
Lightweight 3D printed parts for smooth walking
Code from Gabriel Ro-Bot-X and Kai Neugebauer for better movement
An ultrasonic sensor to detect and avoid obstacles automatically
Watch the robot in action:
Simple Parts and Materials You’ll Need
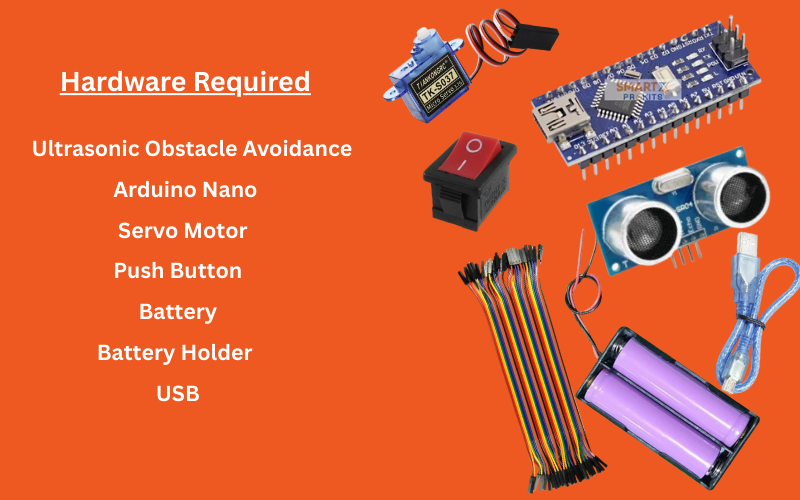
Electronics
Arduino Nano microcontroller
5× Tower Pro SG90 micro servos (4 for legs & feet, 1 for head)
1× HC-SR04 ultrasonic distance sensor
Small on/off rocker switch
Power supply – 2× 3.7V LiPo batteries in parallel (or 5V source)
Hardware
2× M3 × 25 mm screws (head servo mount) — M2 preferred
4× M3 × 12 mm screws (mounting servos)
6× M3 nuts
Hot glue or super glue
Tools
3D printer (PLA or similar filament)
Screwdriver set
Glue gun
(Optional) Soldering iron for neat wiring
Keywords:
simple Arduino Nano biped robot parts, easy DIY walking robot kit, SG90 servo biped materials
Step 1: 3D Print the Simple Robot Parts
Download the OpenSCAD files from the project zip (“OpenScad Files with Utils Folder.zip”).
Use these easy print settings:
Material: PLA
Infill: 10% (lightweight design)
Supports: On for overhangs
Parts to print:
Build platform
Head mount
Legs
Feet
Keywords: simple 3D printed biped robot, lightweight Arduino walking robot body, DIY Arduino robot 3D files
Step 2: Prepare and Mount the Servos
You’ll use 5 simple SG90 servo motors.
Servo pin mapping:
Left Leg → Pin 7
Right Leg → Pin 10
Left Foot → Pin 8
Right Foot → Pin 9
Head → Pin 6
Mount servos with screws or hot glue.
Trim extra plastic from the servo mount wings inside the feet so they don’t catch when walking.
Step 3: Simple Wiring for Your Arduino Robot
Connect the on/off switch to the positive battery wire.
Connect the battery pack to VIN and GND on the Arduino Nano.
Wire the HC-SR04 sensor:
Trigger → Pin 12
Echo → Pin 11
Connect servo signal wires to the pins listed above.
Keywords: simple Arduino Nano wiring diagram, easy HC-SR04 Arduino connection, SG90 servo pin setup
Step 4: Upload the Easy Arduino Code
Install the Arduino IDE.
Add the NewPing library:
Sketch → Include Library → Add .ZIP Library
Download BiPed Arduino Code.zip → extract → rename to uBipedino.
Open the .ino file in Arduino IDE.
Select Board: Arduino Nano → Upload.
Step 5: Adjust for Smooth Walking
Position the servo horns so legs stand straight.
Test walk — adjust horn positions or code angles if needed.
Step 6: Switch On and Enjoy
Turn on the robot and watch it walk.
The ultrasonic sensor will detect obstacles and change direction automatically.
Try modifying the code for faster steps or fun movements.
Why This Simple Robot is Perfect for Beginners
Easy Arduino learning without complex wiring
Simple servo motor control
Lightweight 3D printing for robotics
Fun obstacle avoidance using HC-SR04
Low cost, easy to build
Circuit Diagram for Arduped 2 Biped Robot
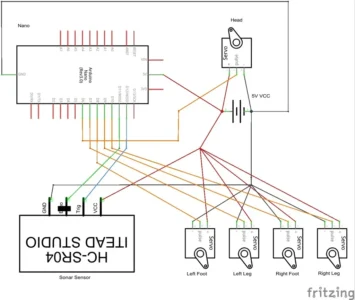
Connections
Arduino Nano → Servos
Pin 7 → Left Leg Servo
Pin 10 → Right Leg Servo
Pin 8 → Left Foot Servo
Pin 9 → Right Foot Servo
Pin 6 → Head Servo
Arduino Nano → Ultrasonic Sensor (HC-SR04)
Pin 12 → Trigger
Pin 11 → Echo
VCC → +5V
GND → GND
Power Supply
LiPo Battery Pack → On/Off Switch → VIN (+) on Nano
LiPo Battery Pack (–) → GND on Nano
Code
#include <Servo.h>
#include <NewPing.h>
// — Pin Definitions —
#define TRIGGER_PIN 12
#define ECHO_PIN 11
#define LEFT_LEG 7
#define RIGHT_LEG 10
#define LEFT_FOOT 8
#define RIGHT_FOOT 9
#define HEAD_SERVO 6
#define MAX_DISTANCE 200 // cm
// — Create Objects —
NewPing sonar(TRIGGER_PIN, ECHO_PIN, MAX_DISTANCE);
Servo leftLeg, rightLeg, leftFoot, rightFoot, headServo;
// — Servo Center Positions (adjust to your robot) —
int LLcenter = 90; // Left leg
int RLcenter = 90; // Right leg
int LFcenter = 90; // Left foot
int RFcenter = 90; // Right foot
int Hcenter = 70; // Head servo
// — Setup —
void setup() {
Serial.begin(9600);
leftLeg.attach(LEFT_LEG);
rightLeg.attach(RIGHT_LEG);
leftFoot.attach(LEFT_FOOT);
rightFoot.attach(RIGHT_FOOT);
headServo.attach(HEAD_SERVO);
centerServos();
delay(1000);
}
// — Loop —
void loop() {
unsigned int distance = getDistance();
Serial.print(“Distance: “);
Serial.println(distance);
if (distance < 20) {
avoidObstacle(); // Turn if obstacle detected
} else {
walkForward(); // Walk if clear
}
}
// — FUNCTIONS —
void centerServos() {
leftLeg.write(LLcenter);
rightLeg.write(RLcenter);
leftFoot.write(LFcenter);
rightFoot.write(RFcenter);
headServo.write(Hcenter);
}
// Get distance from ultrasonic
unsigned int getDistance() {
delay(50);
unsigned int cm = sonar.ping_cm();
if (cm == 0) cm = MAX_DISTANCE;
return cm;
}
// Walking sequence (one step)
void walkForward() {
// Step 1: Lift left leg forward
leftLeg.write(LLcenter – 20);
leftFoot.write(LFcenter + 15);
delay(200);
// Step 2: Return left leg
leftLeg.write(LLcenter);
leftFoot.write(LFcenter);
delay(200);
// Step 3: Lift right leg forward
rightLeg.write(RLcenter + 20);
rightFoot.write(RFcenter – 15);
delay(200);
// Step 4: Return right leg
rightLeg.write(RLcenter);
rightFoot.write(RFcenter);
delay(200);
}
// Avoid obstacle by turning right
void avoidObstacle() {
// Look left and right using head servo
headServo.write(Hcenter – 40);
delay(400);
unsigned int leftDist = getDistance();
headServo.write(Hcenter + 40);
delay(400);
unsigned int rightDist = getDistance();
headServo.write(Hcenter); // Reset head
if (rightDist > leftDist) {
turnRight();
} else {
turnLeft();
}
}
// Turn right
void turnRight() {
for (int i = 0; i < 3; i++) {
leftLeg.write(LLcenter – 25);
rightLeg.write(RLcenter – 25);
delay(250);
centerServos();
delay(200);
}
}
// Turn left
void turnLeft() {
for (int i = 0; i < 3; i++) {
leftLeg.write(LLcenter + 25);
rightLeg.write(RLcenter + 25);
delay(250);
centerServos();
delay(200);
}
}