


Beginner Project: Build Otto DIY+ Bluetooth Robot with Arduino
Project Overview
The Otto DIY+ Robot is a small, open-source humanoid robot that can walk, dance, and be controlled via Bluetooth.
It’s a great beginner robotics project that teaches you about servo motors, Arduino programming, and wireless control.
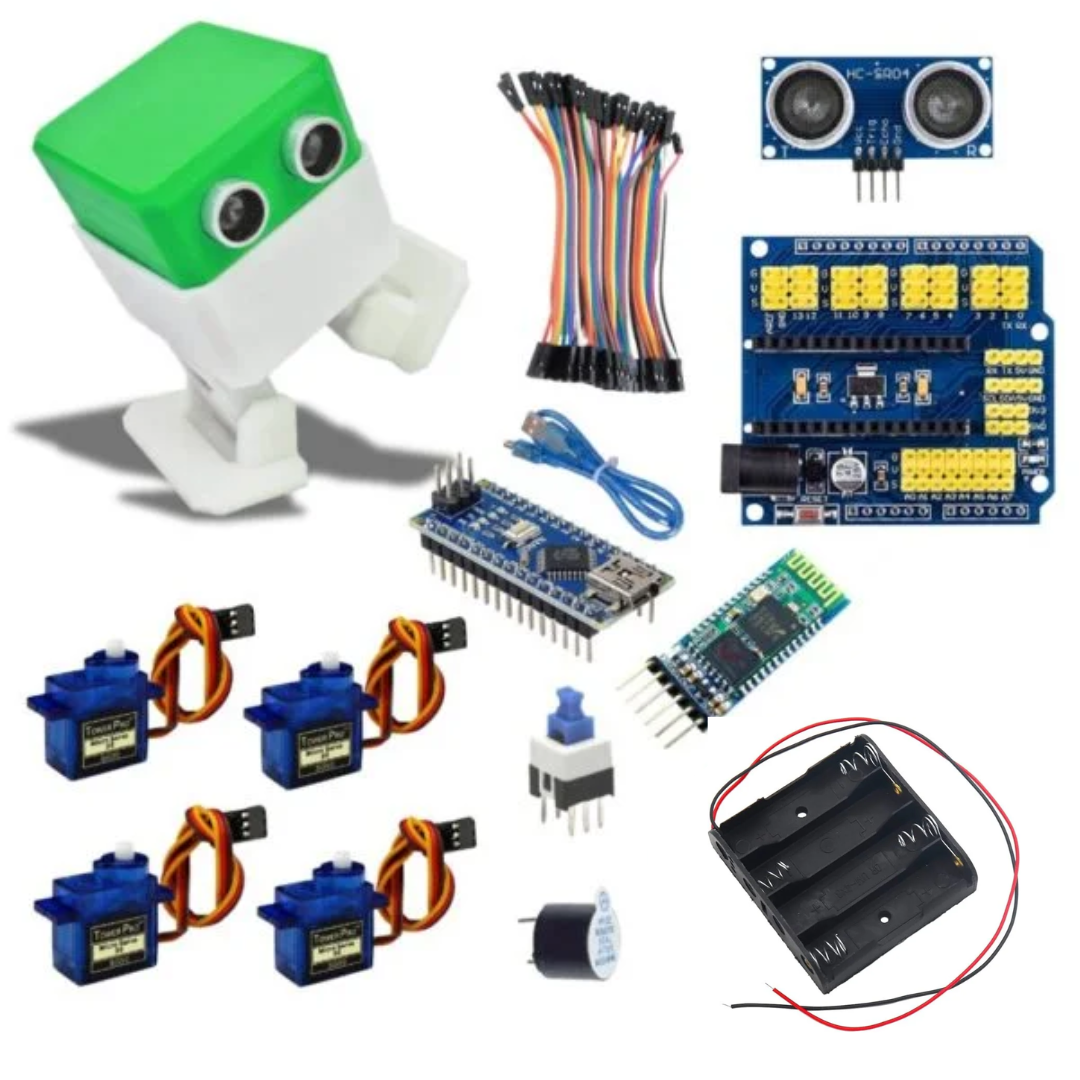
🛠️ Components Required
Arduino Nano (recommended) or UNO
4 × SG90 Micro Servos (for legs/feet)
HC-05 Bluetooth Module
Buzzer (for sounds)
Ultrasonic Sensor (HC-SR04) (for obstacle detection, optional)
3D Printed Otto Robot Body (head, legs, feet)
Battery pack (4×AA or 7.4V Li-ion)
Jumper wires (male-to-female)
Pin Connections
| Component | Arduino Pin | Notes |
|---|---|---|
| Left Leg Servo | D2 | PWM |
| Right Leg Servo | D3 | PWM |
| Left Foot Servo | D4 | PWM |
| Right Foot Servo | D5 | PWM |
| HC-05 TX | D11 | SoftwareSerial RX |
| HC-05 RX | D12 | SoftwareSerial TX (with voltage divider) |
| Ultrasonic TRIG | D9 (optional) | Trigger Pin |
| Ultrasonic ECHO | D10 (optional) | Echo Pin |
| Buzzer | D13 | Sound |
| Power | 5V & GND | Shared supply for Arduino + modules |
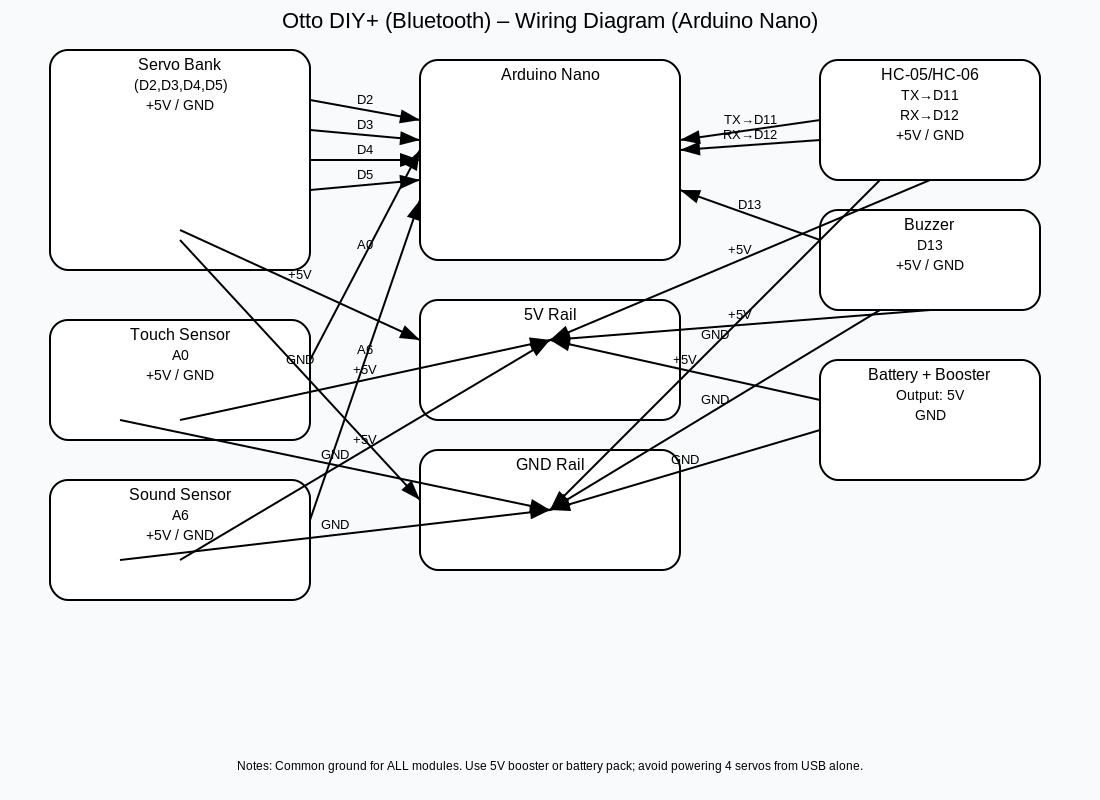
Circuit Diagram
👉 The Otto robot is wired around the Arduino Nano inside the head.
(I can make you a beginner-style circuit diagram with Nano + 4 servos + HC-05 + buzzer if you want, like I did for the robot car.)
Arduino Code
#include <Servo.h> // Library for controlling servos
#include <SoftwareSerial.h> // Library for Bluetooth communication
// Bluetooth module on pins D11 (RX) and D12 (TX)
SoftwareSerial BT(11, 12);
// Define servo motors
Servo leftLeg, rightLeg, leftFoot, rightFoot;
void setup() {
// Start Bluetooth and Serial monitor
BT.begin(9600);
Serial.begin(9600);
// Attach servos to corresponding pins
leftLeg.attach(2);
rightLeg.attach(3);
leftFoot.attach(4);
rightFoot.attach(5);
// Set all servos to center position
centerPosition();
}
void loop() {
// Check if Bluetooth command is received
if (BT.available()) {
char cmd = BT.read();
Serial.println(cmd); // Print received command to Serial Monitor
// Execute command
switch (cmd) {
case ‘F‘: walkForward(); break; // Forward
case ‘B‘: walkBackward(); break; // Backward
case ‘L‘: turnLeft(); break; // Turn Left
case ‘R‘: turnRight(); break; // Turn Right
case ‘D‘: dance(); break; // Dance
case ‘S‘: centerPosition(); break; // Stop / Reset
case ‘H‘: helloMove(); break; // Wave Hello
}
}
}
// ———- Servo Movement Functions ———-
// Center all servos
void centerPosition() {
leftLeg.write(90);
rightLeg.write(90);
leftFoot.write(90);
rightFoot.write(90);
}
// Walk Forward
void walkForward() {
leftLeg.write(120);
rightLeg.write(60);
delay(300);
centerPosition();
delay(300);
}
// Walk Backward
void walkBackward() {
leftLeg.write(60);
rightLeg.write(120);
delay(300);
centerPosition();
delay(300);
}
// Turn Left
void turnLeft() {
leftFoot.write(60);
rightFoot.write(120);
delay(500);
centerPosition();
}
// Turn Right
void turnRight() {
leftFoot.write(120);
rightFoot.write(60);
delay(500);
centerPosition();
}
// Dance Movement
void dance() {
for (int i = 0; i < 3; i++) {
leftLeg.write(60);
rightLeg.write(120);
delay(300);
leftLeg.write(120);
rightLeg.write(60);
delay(300);
}
centerPosition();
}
// Wave Hello
void helloMove() {
for (int i = 0; i < 3; i++) {
leftFoot.write(120);
delay(300);
leftFoot.write(60);
delay(300);
}
centerPosition();
}
Video
Bluetooth Commands
Use any Bluetooth controller app to send commands:
| Command | Action |
|---|---|
| F | Walk Forward |
| B | Walk Backward |
| L | Turn Left |
| R | Turn Right |
| D | Dance |
| H | Wave Hello |
| S | Stop / Reset |
🤝 Teamwork Idea for Students
Team A: Assemble Otto’s 3D-printed body and mount servos
Team B: Wire the Arduino Nano, Bluetooth, and buzzer
Team C: Upload Arduino code and test via phone
Conclusion
You have successfully built Otto DIY+, a Bluetooth-controlled humanoid robot 🤖.
It’s a beginner-friendly project that introduces Arduino programming, servo motors, and wireless control — with plenty of room to expand by adding sensors, music, and more moves.