


Beginner Guide: Make a Bluetooth + Obstacle Avoidance Robot Car (4 Motors)
🎯 What You’ll Learn
How to connect Bluetooth (HC-05) to Arduino
How to use an ultrasonic sensor (HC-SR04) with the NewPing library
How to drive 4 motors using an L298N motor driver
How to switch between manual Bluetooth mode and automatic obstacle avoidance mode
Assembly
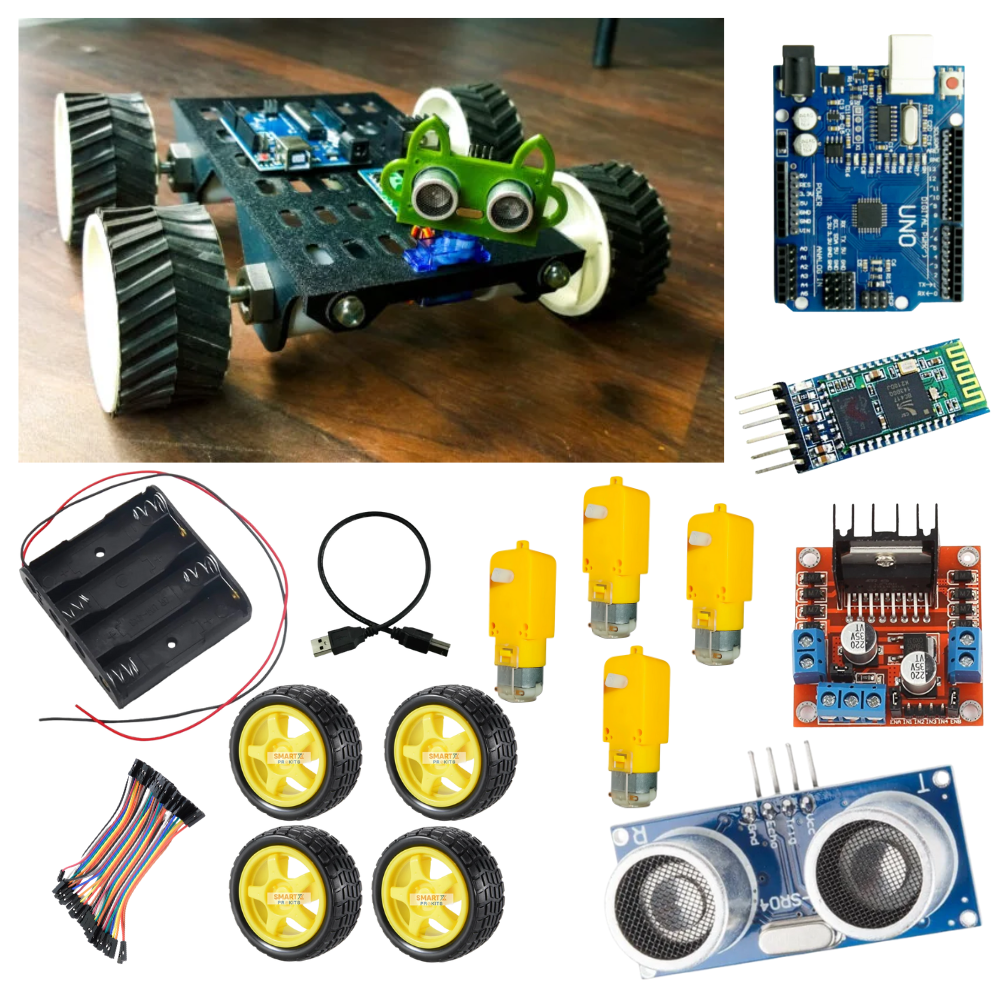

🛠️ Parts Needed
Arduino Uno (or Nano)
L298N motor driver (1 or 2 depending on current)
4 × DC motors with wheels
HC-05 Bluetooth module
HC-SR04 ultrasonic sensor
Battery pack (7.4–12 V Li-ion recommended)
Jumper wires + switch
Pin Connections
Component | Arduino Pin | Notes |
HC-05 TX | D2 | Use SoftwareSerial |
HC-05 RX | D3 | Use divider (1k/2k) |
HC-SR04 TRIG | D12 | Ultrasonic trigger |
HC-SR04 ECHO | D13 | Ultrasonic echo |
L298N ENA | D5 (PWM) | Left motors speed |
L298N IN1 | D7 | Left forward |
L298N IN2 | D8 | Left backward |
L298N ENB | D6 (PWM) | Right motors speed |
L298N IN3 | D9 | Right forward |
L298N IN4 | D10 | Right backward |
Motors | OUT1/OUT2 → Left motors (x2) | Motors in parallel |
Battery + | L298N +12V | Power motors |
Battery – | L298N GND + Arduino GND | Common ground |
Video
Arduino Code
#include <SoftwareSerial.h>
#include <NewPing.h>
// ———- Bluetooth ———-
SoftwareSerial BT(2, 3); // D2 = RX, D3 = TX
// ———- Ultrasonic ———-
#define TRIG_PIN 12
#define ECHO_PIN 13
#define MAX_DISTANCE 200
NewPing sonar(TRIG_PIN, ECHO_PIN, MAX_DISTANCE);
// ———- Motor Driver ———-
#define ENA 5 // Left Motor Speed (PWM)
#define IN1 7 // Left Motor Direction
#define IN2 8
#define ENB 6 // Right Motor Speed (PWM)
#define IN3 9 // Right Motor Direction
#define IN4 10
// ———- Variables ———-
bool autoMode = false;
int baseSpeed = 180; // Default speed (0–255)
// ———- Motor Functions ———-
void setLeft(int spd, bool forward) {
analogWrite(ENA, spd);
digitalWrite(IN1, forward ? HIGH : LOW);
digitalWrite(IN2, forward ? LOW : HIGH);
}
void setRight(int spd, bool forward) {
analogWrite(ENB, spd);
digitalWrite(IN3, forward ? HIGH : LOW);
digitalWrite(IN4, forward ? LOW : HIGH);
}
void stopAll() {
analogWrite(ENA, 0);
analogWrite(ENB, 0);
digitalWrite(IN1, LOW);
digitalWrite(IN2, LOW);
digitalWrite(IN3, LOW);
digitalWrite(IN4, LOW);
}
void forward() {
setLeft(baseSpeed, true);
setRight(baseSpeed, true);
}
void backward() {
setLeft(baseSpeed, false);
setRight(baseSpeed, false);
}
void leftTurn() {
setLeft(baseSpeed, false);
setRight(baseSpeed, true);
}
void rightTurn() {
setLeft(baseSpeed, true);
setRight(baseSpeed, false);
}
// ———- Ultrasonic Distance ———-
int getDist() {
int d = sonar.ping_cm();
return (d == 0) ? MAX_DISTANCE : d; // return MAX if no object
}
// ———- Setup ———-
void setup() {
pinMode(ENA, OUTPUT);
pinMode(IN1, OUTPUT);
pinMode(IN2, OUTPUT);
pinMode(ENB, OUTPUT);
pinMode(IN3, OUTPUT);
pinMode(IN4, OUTPUT);
stopAll(); // Ensure motors are off at start
Serial.begin(9600);
BT.begin(9600);
Serial.println(“Robot Ready!”);
}
// ———- Loop ———-
void loop() {
// ———- Bluetooth Commands ———-
if (BT.available()) {
char c = BT.read();
if (c >= ‘0‘ && c <= ‘9‘) {
// Speed control 0–9 maps to 80–255
baseSpeed = map(c – ‘0‘, 0, 9, 80, 255);
Serial.print(“Speed set to: “);
Serial.println(baseSpeed);
} else {
switch (c) {
case ‘F‘: autoMode = false; forward(); Serial.println(“Forward“); break;
case ‘B‘: autoMode = false; backward(); Serial.println(“Backward“); break;
case ‘L‘: autoMode = false; leftTurn(); Serial.println(“Left“); break;
case ‘R‘: autoMode = false; rightTurn(); Serial.println(“Right“); break;
case ‘S‘: autoMode = false; stopAll(); Serial.println(“Stop“); break;
case ‘A‘: autoMode = true; Serial.println(“Auto Mode ON“); break;
case ‘M‘: autoMode = false; stopAll(); Serial.println(“Manual Mode“); break;
}
}
}
// ———- Auto Mode ———-
if (autoMode) {
int d = getDist();
Serial.print(“Distance: “);
Serial.println(d);
if (d < 20) {
stopAll(); delay(100);
backward(); delay(300);
stopAll(); delay(100);
rightTurn(); delay(400);
stopAll(); delay(100);
} else {
forward();
}
}
}
Bluetooth Commands
Use a Bluetooth Controller App (like “Arduino Bluetooth Controller”) on your phone.
Pair with HC-05 (PIN: 1234 or 0000).
| Command | Action |
|---|---|
| F | Forward |
| B | Backward |
| L | Left |
| R | Right |
| S | Stop |
| A | Auto Mode (Obstacle Avoid) |
| M | Manual Mode |
| 0–9 | Speed Levels |
Teamwork Idea
Team A: Assemble chassis + motors
Team B: Do wiring & connections
Team C: Upload code + test via Bluetooth
Conclusion
By the end of this project, you’ll have a Bluetooth-controlled robot car that can also avoid obstacles automatically.
This beginner-friendly build teaches Arduino programming, motor control, and sensor integration — a great school robotics project!