


Arduino Radar Project – Ultrasonic Based Radar – Connection and Code
The aim of this Arduino Radar project is to achieve a radar system prototype based on an Arduino board that detects stationary and moving objects.
Do you know? the first time, Radar was developed as a method of detecting enemy aircraft in World War 2. Along with the developments in technology, these days it is used in a wide range of sectors. Since the last few decades, there have been significant advancements in the use of radar technology.
This Arduino radar project aims to achieve a radar system prototype based on an Arduino board that detects stationary and moving objects. The radar system has different performance specifications, and it is also available in a variety of sizes.
How does Radar Work?
The word RADAR means Radio Detection And Ranging. Radar is an object detection system that uses microwaves to determine the range, altitude, direction, and speed of objects within about a 100-mile radius of their location.
The radar antenna transmits radio waves or microwaves that bounce off any object in their path. Due to this, we can easily determine the object in the radar range.
The basic principle of operation:
A radar is an electromagnetic sensor that is used to detect and locate an object.
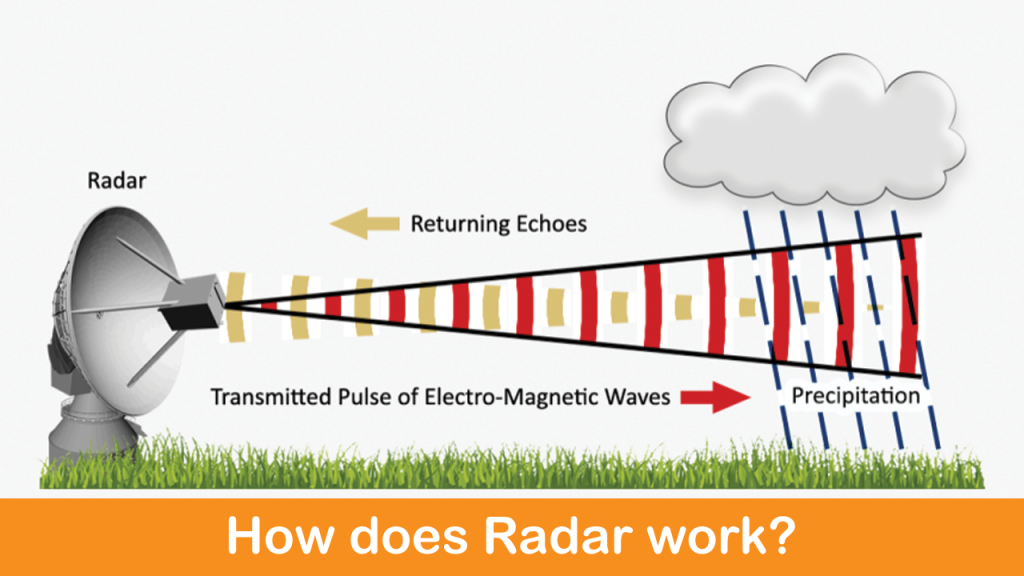
Radio waves or microwaves are radiated out from the radar into free space. Some of these waves are intercepted by reflecting objects.
These intercepted radio waves hit the target and are reflected in many different directions. Some of these waves can be directed back toward the radar, where they are received and amplified.
If these waves are received again at their origin, then it means an object is in the propagation direction.
The modern radar system is very advanced and used in highly diverse applications such as Air traffic control, Air-defence system, radar Astronomy, Antimissile system, Outer space Surveillance system, and many more.
What is Ultrasonic Sensor?
An ultrasonic sensor is a proximity sensor that is used to measure the distance of a target or object. It detects the object by transmitting ultrasonic waves and converts the reflected waves into an electrical signal. These sound waves travel faster than the speed of the sound that humans can hear.
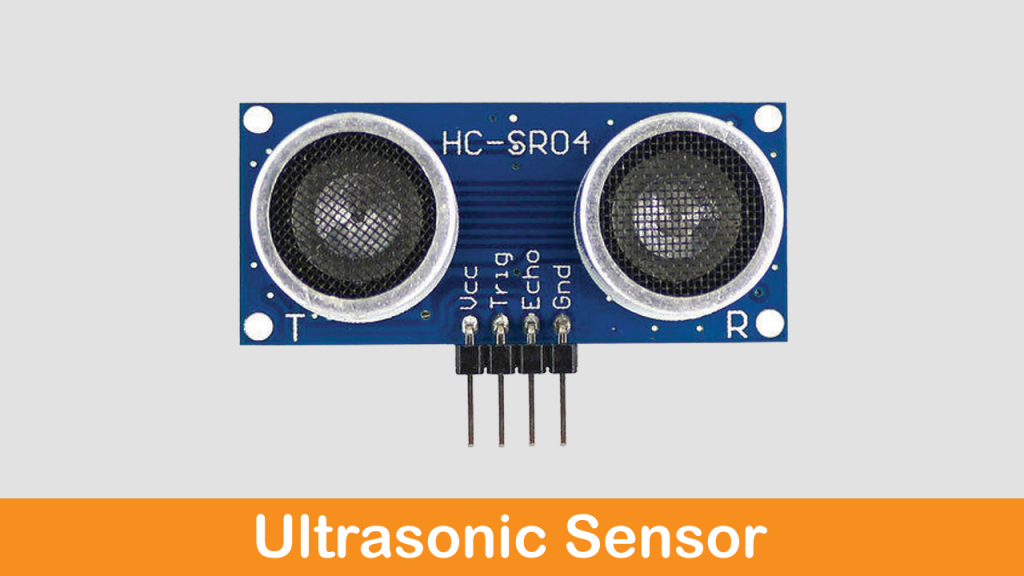
It has two main components: the transmitter & receiver. The transmitter emits the sound using a piezoelectric crystal, and the receiver encounters the sound after it has travelled to and from the target.
For the calculation of the object distance, the sensor measures the time taken by the signal to travel between the transmission of the sound by the transmitter to the reflecting back towards the receiver.
The formula for this calculation is,
D = ½ T x C
Where,
- D = distance,
- T = time
- C = speed of sound which is 343 meters/second.
These sensors are mostly found in automobile self-parking technology and anti-collision safety systems. Also, used in robotic obstacle detection systems, manufacturing technology, and many more. To know more about the ultrasonic sensor,
What is Servo Motor?
The servo motor is a simple DC motor that can be controlled for specific angular rotation with the help of additional servomechanism. This motor will only rotate as much we want and then stop. The servo motor is a closed-loop mechanism that uses positional feedback to control the speed and position.
This closed-loop system includes a control circuit, servo motor, shaft, potentiometer, drive gears, amplifier, and either an encoder or resolver.

The servo motor is unlike a standard electric motor which starts and stops according to the power input. According to the signal, the servo motor will work.
Nowadays, servo motors are widely used in industrial and robotics applications. They are also commonly seen in remote-controlled toy cars, RC planes, and in the CD or DVD player. Besides these, we see hundreds of applications in our daily life that use a servo motor.
Preparing the Fixture
After fixing it, the mounting bracket is screwed to the servo motor. Kindly use the DST (double-sided) tape to fix the servo motor firmly with the surface so that it can easily handle the weight of the bracket and the ultrasonic Sensor.
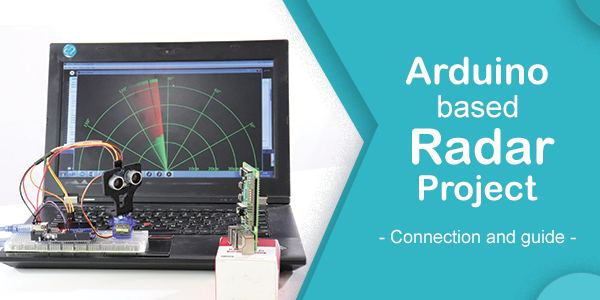
Hardware Connection
The below image shows the connection of the Arduino radar project. The connections are very simple. Here, we have interfaced the ultrasonic sensor and servo motor with an Arduino Uno. The connection details are,
| Arduino Uno | Ultrasonic Sensor | Servo Motor |
| Vcc | Vcc | Vcc |
| Gnd | Gnd | Gnd |
| D10 | Trig | – |
| D11 | Echo | – |
| D12 | – | Signal |

Here is the Arduino source code:
// Includes the Servo library #include <Servo.h>. // Defines Tirg and Echo pins of the Ultrasonic Sensor const int trigPin = 10; const int echoPin = 11; // Variables for the duration and the distance long duration; int distance; Servo myServo; // Creates a servo object for controlling the servo motor void setup() { pinMode(trigPin, OUTPUT); // Sets the trigPin as an Output pinMode(echoPin, INPUT); // Sets the echoPin as an Input Serial.begin(9600); myServo.attach(12); // Defines on which pin is the servo motor attached } void loop() { // rotates the servo motor from 15 to 165 degrees for(int i=15;i<=165;i++){ myServo.write(i); delay(30); distance = calculateDistance();// Calls a function for calculating the distance measured by the Ultrasonic sensor for each degree Serial.print(i); // Sends the current degree into the Serial Port Serial.print(“,”); // Sends addition character right next to the previous value needed later in the Processing IDE for indexing Serial.print(distance); // Sends the distance value into the Serial Port Serial.print(“.”); // Sends addition character right next to the previous value needed later in the Processing IDE for indexing } // Repeats the previous lines from 165 to 15 degrees for(int i=165;i>15;i–){ myServo.write(i); delay(30); distance = calculateDistance(); Serial.print(i); Serial.print(“,”); Serial.print(distance); Serial.print(“.”); } } // Function for calculating the distance measured by the Ultrasonic sensor int calculateDistance(){ digitalWrite(trigPin, LOW); delayMicroseconds(2); // Sets the trigPin on HIGH state for 10 micro seconds digitalWrite(trigPin, HIGH); delayMicroseconds(10); digitalWrite(trigPin, LOW); duration = pulseIn(echoPin, HIGH); // Reads the echoPin, returns the sound wave travel time in microseconds distance= duration*0.034/2; return distance; }
Output
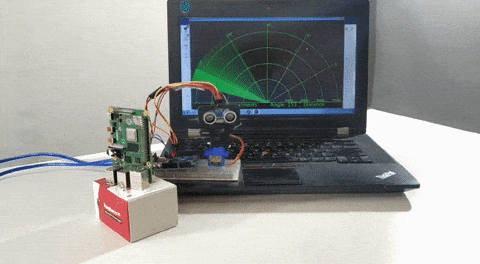
After uploading the code, the servo motors start running from 0 to 180 degrees and again back to 0 degrees. An ultrasonic sensor also rotates along with the servo as it is mounted on the motor.
Now, open the processing application and paste the above code. In this code, update the where your Arduino board is connected.
Now, run this processing code. If your code is right then, you will get a new window. This is the graphical representation of data from the Ultrasonic Sensor is represented in a radar type display.
If an ultrasonic sensor detects any object within its range, you can see the same on the graphical representation. The below gif shows the output of the Arduino radar project.
Final Words
I hope this tutorial helps you understand the radar sensor, it’s working, and the prototype of the Arduino radar project.