Detailed guide on What is Arduino?
As you are here, I assume you are new to the world of Arduino. Welcome! to the most popular topic of the electronics field. In this guide, I will be

As you are here, I assume you are new to the world of Arduino. Welcome! to the most popular topic of the electronics field. In this guide, I will be explaining to you what is Arduino? and how it makes a difference in the world.
By reading this blog you will learn
Introduction to Basics of Arduino Boards
Hardware Part
Software Part
Where is Arduino Used?
Arduino Architecture
Arduino Pin Configuration
Types of Arduino
Applications of Arduino as a Microcontroller
Introduction to Basics of Arduino
SIDENOTE: Let me explain you in brief, the term Open Source indicates that all the resources for the board are free and open to all. This means anyone can modify it according to their need.
Arduino is an open-source electronics prototyping platform based on flexible, easy-to-use hardware and software. It’s intended for artists, designers, hobbyists, and anyone interested in creating interactive objects or environments.
Arduino can sense the environment by receiving input from a variety of sensors and can affect its surroundings by controlling lights, motors, and other actuators. The microcontroller on the board is programmed using the Arduino programming language (based on Wiring) and the Arduino development environment (based on Processing). Arduino projects can be stand-alone or they can communicate with software on running on a computer (e.g. Flash, Processing, MaxMSP).
Depending upon the above fact, the fun part that I want you to know, the Arduino is designed, developed and made popular by the community of makers who constantly share their electronics project ideas with the world. The work that they did, does or will do is publicaly available or “Open-Source” meaning you can copy their project connections, codes, component to complete the project and sometimes or many-times everybody shares how exactly Step-by-Step they are doing things with Arduino. Cool!
Arduino is an open-source electronics platform based on easy-to-use hardware and software. Arduino boards are able to read inputs – light on a sensor, a finger on a button, or a Twitter message – and turn it into an output – activating a motor, turning on an LED, publishing something online. You can tell your board what to do by sending a set of instructions to the microcontroller on the board. To do so you use the Arduino programming language (based on Wiring), and the Arduino Software (IDE), based on Processing.
Most Arduino boards consist of an Atmel 8-bit AVR microcontroller (ATmega8, ATmega168, ATmega328, ATmega1280, or ATmega2560) with varying amounts of flash memory, pins, and features.
This compact size and the easy-to-use microcontroller is the brain for many small electronics based projects to complex projects that will make you Electronics Superhero. So, let’s continue and know more about this Arduino. First, the hardware!!!
Arduino Hardware Part
Most articles only explain the software of Arduinos: what’s on the virtual software, what each function does, etc. However, understanding the hardware design makes you forward in the knowledge of Arduino. The Arduino consists of a simple baseboard. This baseboard has a microcontroller and its support circuitry along with connectors to connect to plug-in modules and a USB interface to download code from the PC. Eg. Arduino Uno.

The Arduino Uno can be powered via the USB connection or with an external power supply. The power source is selected automatically by the board, you don’t need to worry about it.
The external (non-USB) power can come either from an AC-to-DC adapter or battery. You should connect the adapter by plugging a 2.1mm center-positive plug into the board’s power jack. Also, You can insert leads from a battery in the GND and Vin pin headers of the POWER connector.
The board can operate on an external supply of 6 to 20 volts but, there’s a safety precaution for the board. If you supply less than 7V, the 5V pin may supply less than five volts and the board may be unstable. So, it’s better to go for greater than 7V but less than 12V. Because, If you use more than 12V external supply to the board, the voltage regulator may overheat and damage the board. That’s why the recommended range is 7 to 12 volts.
The power pins are as follows:
• Vin – It is the input voltage to the Arduino board when it’s using an external power source (as
opposed to 5 volts from the USB connection or other regulated power source). You can
supply voltage through this pin or access it through this pin if you are supplying voltage via the power jack.
• 5V – It is the regulated power supply pin used to power the microcontroller and other components on the board. This can come either from VIN via an on-board regulator, or be supplied by USB or another regulated 5V supply.
• 3V3 – It is a 3.3 volt supply generated by the on-board regulator. Its maximum current draw is 50 mA.
• GND – Ground pins.
How to Identify Original & Duplicate Arduinos?
As Arduino is open-source hardware and software, anyone can download the design file of Arduino from their website and can make their own boards exactly similar without infringing their rights, due to this there are a number of variants of Arduino UNO boards available in the market. But, How to differentiate them from the original ones.
- First of all, the Arduino name is the copyright of the company. Any other variant board manufacturer apart from Arduino’s company can’t use the label ‘Arduino’ on board. They are supposed to name the product as ‘compatible with Arduino’. However, you won’t see ‘Made in Italy’ on it.
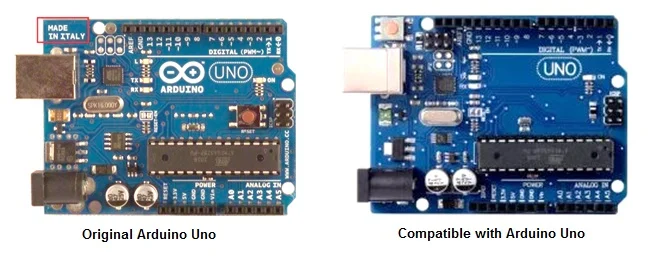
There is no difference in working of both compatible and original UNO. Also, there are few check-points to check between counterfeit variants!
- Check for the hologram first. It will have a hologram over the box stating originality of the product if you’ve bought for product name –original Arduino. If not, take a careful look at the packaging. If it is way too mainstream, it is undoubtedly pirated version of the product.
- Download the original software of Arduino. This is another check point. Once you interface a pirated hardware with the original software, it will either not response or will start misbehaving.
- What if it still connects & responds to the software? Still don’t worry, download official user manual from the site. It contains various programs for initiation on the board, try to burn the code & check if the program burns into the board? If program runs, your board is Okay!

