

 Industrial Automation
 3D Printing
 Electronic
 Hardware
 RC Plane and Drone
 Robotic
 Science Fair Project


3D Printed Robotic Hand For DIY Projects(Electronic Components Not Included) - 056
Original price was: ₹2,000.20.₹1,780.20Current price is: ₹1,780.20. + GST

Top mount 16x2 LCD Display Holder for DIY Projects - 049
Original price was: ₹120.05.₹101.02Current price is: ₹101.02. + GST

24-Pin Panel Mounted Male-Female Connector HE-24 Industrial Heavy Duty (300V 5A)
Original price was: ₹798.00.₹670.40Current price is: ₹670.40. + GST

16x2 LCD Display Holder For DIY Project - 059
Original price was: ₹150.06.₹129.08Current price is: ₹129.08. + GST

Enclosure Box For D1 Mini,Gas Sensor,DHT11 Sensor (Components not included)
Original price was: ₹260.30.₹242.20Current price is: ₹242.20. + GST

16x2 display holder with rotrary encoder support - 047
Original price was: ₹140.00.₹122.72Current price is: ₹122.72. + GST

Gas Sensor Panel Mounted Enclosure For Automation (Sensor not included)
Original price was: ₹68.20.₹46.20Current price is: ₹46.20. + GST

E18-D80NK NPN-NO Adjustable IR Proximity Sensor Switch – 3-80cm Range for Obstacle Detection
Original price was: ₹149.00.₹138.00Current price is: ₹138.00. + GST

Adjustable Sensor Holder For Industrial Automation
Original price was: ₹95.20.₹83.20Current price is: ₹83.20. + GST

3-in-1 Aluminum Heat Sink Set for Raspberry Pi 3/4 – Efficient Cooling for Overclocking and High Power Use
Original price was: ₹15.69.₹13.00Current price is: ₹13.00. + GST

AR28 Nano I/O Expansion Shield for Arduino | Sensor & Servo Breakout Board
Original price was: ₹110.00.₹79.38Current price is: ₹79.38. + GST

4x3 Keypad Panel Mounted Enclosure For DIY Project (Keypad not included)
Original price was: ₹199.20.₹172.42Current price is: ₹172.42. + GST

DIY Robotic Hand Combo Kit – Arduino-Based Smart Hand Project | Wireless Control | STEM Learning Kit
Original price was: ₹3,350.20.₹2,980.20Current price is: ₹2,980.20. + GST

230V AC to 48V DC Converter, 1A – Rail Mount Power Supply for Industrial and Automation Applications
Original price was: ₹1,800.00.₹1,499.00Current price is: ₹1,499.00. + GST

Quadruped Spider Robot Combo Kit – -4 Legged DIY STEM Crawling Robot with Servo Motors
Original price was: ₹2,530.20.₹1,999.30Current price is: ₹1,999.30. + GST

16x2 LCD Display with Arduino Nano Board Enclosure for DIY Projects
Original price was: ₹299.30.₹286.62Current price is: ₹286.62. + GST

28BYJ-48 Stepper Motor Holder For DIY Projects + With Stepper Motor and Driver
Original price was: ₹200.20.₹198.20Current price is: ₹198.20. + GST

DHT11 Sensor module panel mount holder for Automation -048
Original price was: ₹50.20.₹41.10Current price is: ₹41.10. + GST
28BYJ-48 Stepper Motor Holder For DIY Projects (Without Stepper Motor)
Original price was: ₹56.20.₹48.80Current price is: ₹48.80. + GST

LM2596/Xl6009 Holder for DIY Projects -050
Original price was: ₹88.00.₹79.06Current price is: ₹79.06. + GST
3D Printed Robotic Hand For DIY Projects(Electronic Components Not Included) - 056
Original price was: ₹2,000.20.₹1,780.20Current price is: ₹1,780.20. + GST
Top mount 16x2 LCD Display Holder for DIY Projects - 049
Original price was: ₹120.05.₹101.02Current price is: ₹101.02. + GST
24-Pin Panel Mounted Male-Female Connector HE-24 Industrial Heavy Duty (300V 5A)
Original price was: ₹798.00.₹670.40Current price is: ₹670.40. + GST
16x2 LCD Display Holder For DIY Project - 059
Original price was: ₹150.06.₹129.08Current price is: ₹129.08. + GST
Enclosure Box For D1 Mini,Gas Sensor,DHT11 Sensor (Components not included)
Original price was: ₹260.30.₹242.20Current price is: ₹242.20. + GST
16x2 display holder with rotrary encoder support - 047
Original price was: ₹140.00.₹122.72Current price is: ₹122.72. + GST
Gas Sensor Panel Mounted Enclosure For Automation (Sensor not included)
Original price was: ₹68.20.₹46.20Current price is: ₹46.20. + GST
E18-D80NK NPN-NO Adjustable IR Proximity Sensor Switch – 3-80cm Range for Obstacle Detection
Original price was: ₹149.00.₹138.00Current price is: ₹138.00. + GST
Adjustable Sensor Holder For Industrial Automation
Original price was: ₹95.20.₹83.20Current price is: ₹83.20. + GST
3-in-1 Aluminum Heat Sink Set for Raspberry Pi 3/4 – Efficient Cooling for Overclocking and High Power Use
Original price was: ₹15.69.₹13.00Current price is: ₹13.00. + GST
AR28 Nano I/O Expansion Shield for Arduino | Sensor & Servo Breakout Board
Original price was: ₹110.00.₹79.38Current price is: ₹79.38. + GST
4x3 Keypad Panel Mounted Enclosure For DIY Project (Keypad not included)
Original price was: ₹199.20.₹172.42Current price is: ₹172.42. + GST
DIY Robotic Hand Combo Kit – Arduino-Based Smart Hand Project | Wireless Control | STEM Learning Kit
Original price was: ₹3,350.20.₹2,980.20Current price is: ₹2,980.20. + GST
230V AC to 48V DC Converter, 1A – Rail Mount Power Supply for Industrial and Automation Applications
Original price was: ₹1,800.00.₹1,499.00Current price is: ₹1,499.00. + GST
Quadruped Spider Robot Combo Kit – -4 Legged DIY STEM Crawling Robot with Servo Motors
Original price was: ₹2,530.20.₹1,999.30Current price is: ₹1,999.30. + GST
16x2 LCD Display with Arduino Nano Board Enclosure for DIY Projects
Original price was: ₹299.30.₹286.62Current price is: ₹286.62. + GST
28BYJ-48 Stepper Motor Holder For DIY Projects + With Stepper Motor and Driver
Original price was: ₹200.20.₹198.20Current price is: ₹198.20. + GST
DHT11 Sensor module panel mount holder for Automation -048
Original price was: ₹50.20.₹41.10Current price is: ₹41.10. + GST
28BYJ-48 Stepper Motor Holder For DIY Projects (Without Stepper Motor)
Original price was: ₹56.20.₹48.80Current price is: ₹48.80. + GST
LM2596/Xl6009 Holder for DIY Projects -050
Original price was: ₹88.00.₹79.06Current price is: ₹79.06. + GST
Science Project Models

Alcohol detection alarm DIY Experiments Science Project Model STEM KIT (Assembled), 100% Tested
Original price was: ₹1,025.00.₹799.00Current price is: ₹799.00. + GST

LDR Based Light Detection DIY Experiments Science Project Model STEM KIT Ready (Assembled), 100% Tested
Original price was: ₹1,025.00.₹599.00Current price is: ₹599.00. + GST

Design of Alcohol Detection System for Car DIY Experiments Science Project Model STEM KIT (Assembled), 100% Tested
Original price was: ₹1,025.00.₹799.00Current price is: ₹799.00. + GST

Heat Sensor Using NTC DIY Experiments Science Project Model STEM KIT (Assembled), 100% Tested
Original price was: ₹1,025.00.₹599.00Current price is: ₹599.00. + GST

Wheelchair Fall Detection DIY Experiments Science STEM KIT Science Project Model (Assembled), 100% Tested
Original price was: ₹1,024.00.₹599.00Current price is: ₹599.00. + GST

Laser Secutiry system for Bank DIY Experiments Science Project Model STEM KIT (Assembled), 100% Tested
Original price was: ₹1,025.00.₹699.00Current price is: ₹699.00. + GST

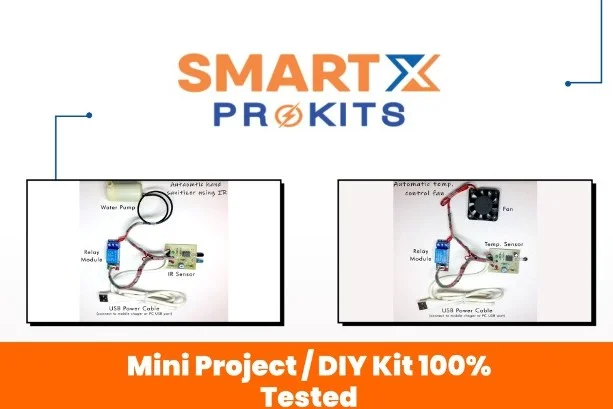
Automatic Temperature Control Fan DIY Experiments Science Project Model STEM KIT (Assembled) – 100% Tested
Original price was: ₹1,025.00.₹599.00Current price is: ₹599.00. + GST
Alcohol Detection for Vehicles DIY Experiments Science Project Model STEM Kit (Assembled, 100% Tested)
Original price was: ₹1,025.00.₹799.00Current price is: ₹799.00. + GST
LDR based Sunset Lamp control Ready DIY Experiments Science Project Model STEM KIT (Assembled), 100% Tested
Original price was: ₹1,025.00.₹599.00Current price is: ₹599.00. + GST

Anti Blast Landmine Project for Indian Army | Inspire Award Project Kit | Science Model | STEM Kit (Assembled, 100% Tested)
Original price was: ₹1,200.00.₹799.00Current price is: ₹799.00. + GST

Rain Water Alarm Sensor DIY Experiments Science Project Model STEM KIT (Assembled), 100% Tested
Original price was: ₹1,025.00.₹599.00Current price is: ₹599.00. + GST
Rain Alarm Project DIY Experiments Science Project Model STEM KIT (Assembled, 100% Tested)
Original price was: ₹1,025.00.₹599.00Current price is: ₹599.00. + GST

Smoke Detection for Industrial safety DIY Experiments Science Project Model STEM KIT (Assembled), 100% Tested
Original price was: ₹1,025.00.₹799.00Current price is: ₹799.00. + GST

Automatic Pump ON/OFF Base on Fire DIY Experiments Science Project Model STEM KIT (Assembled), 100% Tested
Original price was: ₹1,025.00.₹599.00Current price is: ₹599.00. + GST
LDR Based darkness Detection DIY Experiments Science Project Model STEM KIT Ready (Assembled), 100% Tested
Original price was: ₹1,025.00.₹599.00Current price is: ₹599.00. + GST
Switch circuit of pole light using LDR DIY Experiments Science Project Model STEM KIT Ready (Assembled), 100% Tested
Original price was: ₹1,025.00.₹599.00Current price is: ₹599.00. + GST

Theft Alarm Using IR Sensor DIY Experimentsl Science Project Model STEM KIT (Assembled), 100% Tested
Original price was: ₹1,025.00.₹599.00Current price is: ₹599.00. + GST

Third Eye for Blind – Proximity Sensor Eye Glasses DIY Experiments STEM KIT Science Project Model (Assembled), 100% Tested
Original price was: ₹2,499.00.₹1,199.00Current price is: ₹1,199.00. + GST

Automatic Irrigation System DIY Experiments Science Project Model STEM KIT (Assembled), 100% Tested
Original price was: ₹1,025.00.₹699.00Current price is: ₹699.00. + GST

Touch Switch DIY Experiments Science Project Model STEM KIT (Assembled), 100% Tested
Original price was: ₹1,025.00.₹599.00Current price is: ₹599.00. + GST
Alcohol detection alarm DIY Experiments Science Project Model STEM KIT (Assembled), 100% Tested
Original price was: ₹1,025.00.₹799.00Current price is: ₹799.00. + GST
LDR Based Light Detection DIY Experiments Science Project Model STEM KIT Ready (Assembled), 100% Tested
Original price was: ₹1,025.00.₹599.00Current price is: ₹599.00. + GST
Design of Alcohol Detection System for Car DIY Experiments Science Project Model STEM KIT (Assembled), 100% Tested
Original price was: ₹1,025.00.₹799.00Current price is: ₹799.00. + GST
Heat Sensor Using NTC DIY Experiments Science Project Model STEM KIT (Assembled), 100% Tested
Original price was: ₹1,025.00.₹599.00Current price is: ₹599.00. + GST
Wheelchair Fall Detection DIY Experiments Science STEM KIT Science Project Model (Assembled), 100% Tested
Original price was: ₹1,024.00.₹599.00Current price is: ₹599.00. + GST
Laser Secutiry system for Bank DIY Experiments Science Project Model STEM KIT (Assembled), 100% Tested
Original price was: ₹1,025.00.₹699.00Current price is: ₹699.00. + GST
Automatic Temperature Control Fan DIY Experiments Science Project Model STEM KIT (Assembled) – 100% Tested
Original price was: ₹1,025.00.₹599.00Current price is: ₹599.00. + GST
Alcohol Detection for Vehicles DIY Experiments Science Project Model STEM Kit (Assembled, 100% Tested)
Original price was: ₹1,025.00.₹799.00Current price is: ₹799.00. + GST
LDR based Sunset Lamp control Ready DIY Experiments Science Project Model STEM KIT (Assembled), 100% Tested
Original price was: ₹1,025.00.₹599.00Current price is: ₹599.00. + GST
Anti Blast Landmine Project for Indian Army | Inspire Award Project Kit | Science Model | STEM Kit (Assembled, 100% Tested)
Original price was: ₹1,200.00.₹799.00Current price is: ₹799.00. + GST
Rain Water Alarm Sensor DIY Experiments Science Project Model STEM KIT (Assembled), 100% Tested
Original price was: ₹1,025.00.₹599.00Current price is: ₹599.00. + GST
Rain Alarm Project DIY Experiments Science Project Model STEM KIT (Assembled, 100% Tested)
Original price was: ₹1,025.00.₹599.00Current price is: ₹599.00. + GST
Smoke Detection for Industrial safety DIY Experiments Science Project Model STEM KIT (Assembled), 100% Tested
Original price was: ₹1,025.00.₹799.00Current price is: ₹799.00. + GST
Automatic Pump ON/OFF Base on Fire DIY Experiments Science Project Model STEM KIT (Assembled), 100% Tested
Original price was: ₹1,025.00.₹599.00Current price is: ₹599.00. + GST
LDR Based darkness Detection DIY Experiments Science Project Model STEM KIT Ready (Assembled), 100% Tested
Original price was: ₹1,025.00.₹599.00Current price is: ₹599.00. + GST
Switch circuit of pole light using LDR DIY Experiments Science Project Model STEM KIT Ready (Assembled), 100% Tested
Original price was: ₹1,025.00.₹599.00Current price is: ₹599.00. + GST
Theft Alarm Using IR Sensor DIY Experimentsl Science Project Model STEM KIT (Assembled), 100% Tested
Original price was: ₹1,025.00.₹599.00Current price is: ₹599.00. + GST
Third Eye for Blind – Proximity Sensor Eye Glasses DIY Experiments STEM KIT Science Project Model (Assembled), 100% Tested
Original price was: ₹2,499.00.₹1,199.00Current price is: ₹1,199.00. + GST
Automatic Irrigation System DIY Experiments Science Project Model STEM KIT (Assembled), 100% Tested
Original price was: ₹1,025.00.₹699.00Current price is: ₹699.00. + GST
Touch Switch DIY Experiments Science Project Model STEM KIT (Assembled), 100% Tested
Original price was: ₹1,025.00.₹599.00Current price is: ₹599.00. + GST
Most Rated Products

Cute Unicorn DIY Coloring Set 3D Printed | 3 Mini Horse Keychains for Kids | Paintable Fantasy Toys for Girls, Return Gifts & Creative Craft Activities
Original price was: ₹499.00.₹399.00Current price is: ₹399.00. + GST

Wall Mount Charger Holder for Bajaj Chetak EV – Cable Organizer Stand for Home Charging – Compact, Durable Wall Dock
Original price was: ₹1,200.00.₹999.00Current price is: ₹999.00. + GST

Pocket Creature DIY Coloring Set 3D Printed | 4 Mini Keychain Toys for Kids | Paintable Cute Character Models for Return Gifts, School & Art Fun
Original price was: ₹499.00.₹399.00Current price is: ₹399.00. + GST

Low-Cost Walking Robot "Grillo" | Complete Working STEM Project for School – Simple Design with Long Legs & Motor-Driven Movement
Original price was: ₹799.00.₹499.00Current price is: ₹499.00. + GST

Love Labu Keychain 3D Printed | DIY Coloring Keyring Toy for Kids & Gifting | Cute Cartoon-Style Mini Figurine for Bags, Bikes, School & Return Gifts
Original price was: ₹399.00.₹299.00Current price is: ₹299.00. + GST

Walking Robot School Project | Fully Working STEM Model for Students – 3D Printed Biped Robot with Motors & Battery – Ideal for Science Exhibitions
Original price was: ₹799.00.₹499.00Current price is: ₹499.00. + GST

Karate Labu Keychain 3D Printed | DIY Coloring Key Ring for Kids & Collectors | Cartoon Style Mini Figurine Keychain for Bags, Bikes & Gifts
Original price was: ₹599.00.₹299.00Current price is: ₹299.00. + GST

Arduped Biped Robot Frame | Walking Robot Body Kit 3D Part – DIY STEM Robotics Project (Electronics Not Included)
Original price was: ₹799.00.₹399.00Current price is: ₹399.00. + GST

Under Monitor Pen & Sticky Note Holder 3D Printed | Space-Saving Desk Organizer | Minimalist Office Accessory for Pens, Notes & Stationery
Original price was: ₹1,200.00.₹899.00Current price is: ₹899.00. + GST

3D Printed Micro Robot Arm Frame | DIY Mini Robotic Arm Body Kit only , Elecrtonics not included– Ideal for STEM & Robotics Projects
Original price was: ₹799.00.₹499.00Current price is: ₹499.00. + GST

Knight of the Quill – 3D Printed Medieval Knight Pen Holder | Unique Desk Organizer | Cool Gift for Office, Students, Gamers & History Lovers
Original price was: ₹1,200.00.₹699.00Current price is: ₹699.00. + GST

Rope Climbing Robot School Project | Ready-to-Use STEM Educational Model with Motor & Pulley System – Ideal for Science Exhibitions
Original price was: ₹799.00.₹499.00Current price is: ₹499.00. + GST

Stylish Modern Bicycle Bottle Holder | Lightweight & Durable Water Bottle Cage | Elegant 3D Printed Cycle Accessory for MTB, Road & Hybrid Bikes
Original price was: ₹1,200.00.₹699.00Current price is: ₹699.00. + GST

3D Printed Quadruped Robot Frame | Q1 Lite Body Kit for 4-Leg Walking Robot – 3D Parts Only
Original price was: ₹799.00.₹499.00Current price is: ₹499.00. + GST

Warrior Pen Holder 3D Printed | Unique Desk Organizer for Office & Home | Cool Stationery Holder for Kids, Students & Gamers | Table Decor Figurine
Original price was: ₹1,200.00.₹799.00Current price is: ₹799.00. + GST

3D Printed Micro 105 FPV Quadcopter Frame | Lightweight Body Shell for 8.5mm Motors & Micro Flight Boards – DIY Drone build (Frame Only Electronic Not Included)
Original price was: ₹299.00.₹199.00Current price is: ₹199.00. + GST

Chubby Pink T-Rex Dino Pencil Holder – Fun & Functional Desk Organizer | Best Gift for Your Chubby Friend (Copy)
Original price was: ₹899.00.₹499.00Current price is: ₹499.00. + GST

Hyperboloid Pen Holder | Modern Desk Organizer for Pens, Brushes, and Stationery – Artistic Spiral Design
Original price was: ₹599.00.₹499.00Current price is: ₹499.00. + GST

Wall Mount Charger Holder for TVS iQube EV – Cable Organizer for Home Charging – Wall Dock for iQube Electric Scooter Charger
Original price was: ₹1,200.00.₹799.00Current price is: ₹799.00. + GST

3D Printed Snorlax Apple Watch Stand | Cute Cartoon-Themed Charging Dock for Apple Watch Series – Desk Organizer & Nightstand Accessory
Original price was: ₹599.00.₹399.00Current price is: ₹399.00. + GST
BIG SAVING
Single Delivery charges for Multiple Items
AWESOME SUPPORT
Our support lines are open from 10am to 6pm, to support all your queries.
FAST DELIVERY
Fast delivery and Free Shipment on all order above 900 Rs .
SECURE CHECKOUT
We follow highest security standards to make your transaction safe